Problems installing Office 365 on a Laptop with Wireless Connection

Comsol USB 3.0 Ethernet AdapterOffice 365

My daughter has a Toshiba Satellite Laptop and was given a free copy of Microsoft Office 365 as part of her school enrolment.

Unfortunately when she upgraded her laptop to Windows 10, the on-board ethernet adapter stopped working, so she only had WiFi network access.

When we tried to download office using the new “Click to Install” technology, the installation continually failed because the WiFi connection was not fast enough.

Sadly, Office 365 is not available on CD or DVD, so the only way we could install it was as a download.

I am aware that Microsoft offers an offline installation option via the “My Account” option, but this isn’t available for school-based copies of Office, only for store-bought copies.  The school portal only allows a “Click to Install” option.

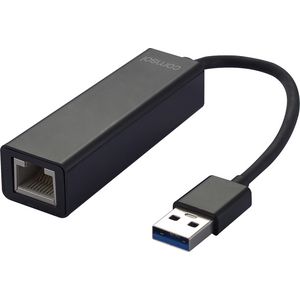
After trying to fix the on-board ethernet adapter, and scouring the web for Windows 10 drivers, I decided this was a waste of my time, and bought a Comsol USB 3.0 Ehternet Adapter for the laptop.

This turns a USB 3.0 port into a hard-wired ethernet adapter.

I then pluged the laptop into the wired Lan via an RJ45 cable, started the Office 365 download, and hey presto! It worked!

FigJam to me.

Cost of Comsol USB 3.0 Ethernet adapter: $43.88 from Officeworks.

I could have sent the laptop off to Toshiba to get fixed, but considering the effort taking it there, waiting for it to get fixed, bringing it back, I decided it was cheaper to spend $43 on the adapter.

Warning: Make sure you plug it into a USB 3 port on the laptop.  It doesn’t seem to work if you plug it into a USB 2 port.

I hope this helps anyone else with a similar problem.


DIY iGoogle Upgrade

I’ve upgraded the DIY “iGoogle” start page.

You can see the latest version here: http://nbe.me/demo
The previous version is here: http://nbe.me/olddemov2
The previous previous version is here: http://nbe.me/olddemo
You can download the source for the page here: http://nbe.me/demo/d.zip

Major items:
1. Each widget has its own “Settings” page which allows you to edit settings. Just click on the “settings” button at the top right of any widget:
Widget Settings Button

2. You can add / edit stocks & shares. If you click on the settings button for the stock widget you get a screen which lets you change the existing stock codes, quantities and buy prices.:
Stock Edit Screen
To delete a stock item, click on the red “X” button.
To move a stock item up a line, click on the blue up-arrow (↑)
To move a stock item down a line, click on the blue down-arrow (↓)
To add a stock item, fill in the blanks and click the green “+” button.
To save changes, click on the “SAVE” button.
To cancel changes or close the edit dialog, click on the [x] button at the top right of the window.

3. You can edit the links in the top-bar by clicking on the “*” to the right of the links in the top bar.

4. You can add / edit / remove widgets by clicking on the “Setup” link in the top bar.
setup
To delete a widget, click on the red “X” button.
To move a widget up a line, click on the blue up-arrow (↑)
To move a widget down a line, click on the blue down-arrow (↓)
To add a widget, fill in the blanks and click the green “+” button.
To save changes, click on the “SAVE” button.
To cancel changes or close the edit dialog, click on the [x] button at the top right of the window.
Click “Factory Reset” to clear all your settings and revert back to the original settings that you downloaded from the website.

5. All settings are stored locally on your hard drive using the HTML5 “localStorage” facility. This is like a cookie, only bigger. The page settings were over 4,000 bytes in size, so would not fit in a cookie which officially can’t be larger than about 4,000 bytes. Local storage can be as large as your hard drive, so there are no storage limits, and the security / privacy settings are the same as for cookies.

You can download the source code here:
http://nbe.me/demo/d.zip

If you plan to use the weather widget, please change the “Weather API Key” in the “Setup” screen. Since lots of people are using this start page, the current API key will run out of API calls each day and won’t work. There are instructions on getting your own keys here:
http://tech.neilennis.com/index.php/diy-replacement-for-igoogle/

As with all previous versions, you don’t need to load this start page on a web server. It will run fine from a folder on your computer. Just unzip the zip file, and click on index.html.

If you plan to put it on a public web server, you might want to password protect it with a htaccess file to protect your privacy.

Please try it out and let me know how you go.

DIY Replacement for iGoogle.

iGoogle will be gone at the end of this month.

I love iGoogle. It was free, convenient, and worked well. But because it was provided free by Google, it’s their right to pull the pin on it if they want to.

This event made me realize that any free service online may be cancelled. So if you don’t want the inconvenience of losing a free service that you love, you’re best off doing it yourself.

Here’s my modest attempt at writing my own iGoogle replacement page.

You can download the source for the page here: http://nbe.me/demo/d.zip

When you’ve downloaded the zip, you can unzip it to your own hard drive, or put it on a web server somewhere.

Before you start using it, you need two things: A Google API Key, and a Wunderground API Key.

Google API Key

1. Go to https://code.google.com/apis/console
2. If prompted, click on the “Create Project” button
3. Click on the “Services” button and change the status of “Custom Search API” to “ON”. Accept the terms.
4. Click on the “API Access” Link
5. In the “Simple API Access” section, click on “Create new Server key…”
Leave the “IP Address” box blank, and click “Create”
6. Copy the “API key”. This is your “Google Key” that you need to put in your index.html
7. Edit “index.html” and scroll to line 21 or there abouts. It will say something like:

var GoogleKey = “XXaaAaAAaAaAA9A9a9aaaaaAAA99a9aaaaA9AAA“; // Get your Google key here: https://code.google.com/apis/console

8. Replace the red key with your Google API key.
9. Save the index.html file

 Wunderground Key

1. Go to http://www.wunderground.com/weather/api/
2. Click on “Sign Up for FREE”
3. Create your free account
4. Activate your membership
5. Login to Wunderground
6. Click on “Explore My Options”.
7. Select “Developer” option ($0) then click “Purchase Key”
8. Complete the questionaire honestly.
9. Click on the “Key Stettings” tab.
10. Copy the “Key ID”. This is your “Weather Key” that you need to put in your index.html
11. Edit “index.html” and scroll to line 23 or there abouts. It will say something like:

var WeatherKey     = “99999999999aaaaa“; // Get your API key here: http://www.wunderground.com/weather/api/

12. Replace the red key with your Weather key.
13. Save the index.html file

You might want to change “WeatherCountry” and “WeatherCity” to reflect your home country and city.